Design Team Call
SweetStamps.com is looking for crafters to fill Design Team positions for a four month term starting February 1, 2011. We are seeking parchment crafters, card makers and scrapbookers.
Design Team Benefits:
• Welcome package includes 12 stamps of your choice, 3 Shades™ ink pads or re-inkers and other goodies based on your interests.
• You will receive a 25% discount on purchases from our online store or booth.
• Product allowance of $25.00 per month after your first month of service.
• You will have access to new stamp designs and products first.
• National exposure: have your creations displayed in our booth at well attended trade shows, along with SweetStamps.com’s blog, website and advertisements.
Design Team Requirements:
• You must create a weekly project that will be posted to your personal blog, the DT blog and your
online gallery that includes product links to our online store.
• Participate in all monthly challenges and blog hops.
• Mail six completed projects at the end of your term including a complete supply list.
• Email good quality photos of your projects without a watermark for use on our website, catalog or printed materials.
• Promote SweetStamps.com on your blog with a DT badge and list fellow DT member’s blogs.
• Leave occasional comments on DT members blogs and the company blog.
To Apply:
Email scans or blog links of three of your best projects showing your style to stacey@sweetstamps.com with the subject line SweetStamps.com DT Call. The team will be announced and contacted by email or phone by January 23rd.
Please include:
• Your name, address, phone number and email address
• A brief bio and why you would like to join our team
• Links to your blog and online galleries
• A list of previous and current design teams you have been on (manufacturers, stores, challenge blogs, etc.)

Friday, December 10, 2010
Sunday, December 5, 2010
Open House Make and Take
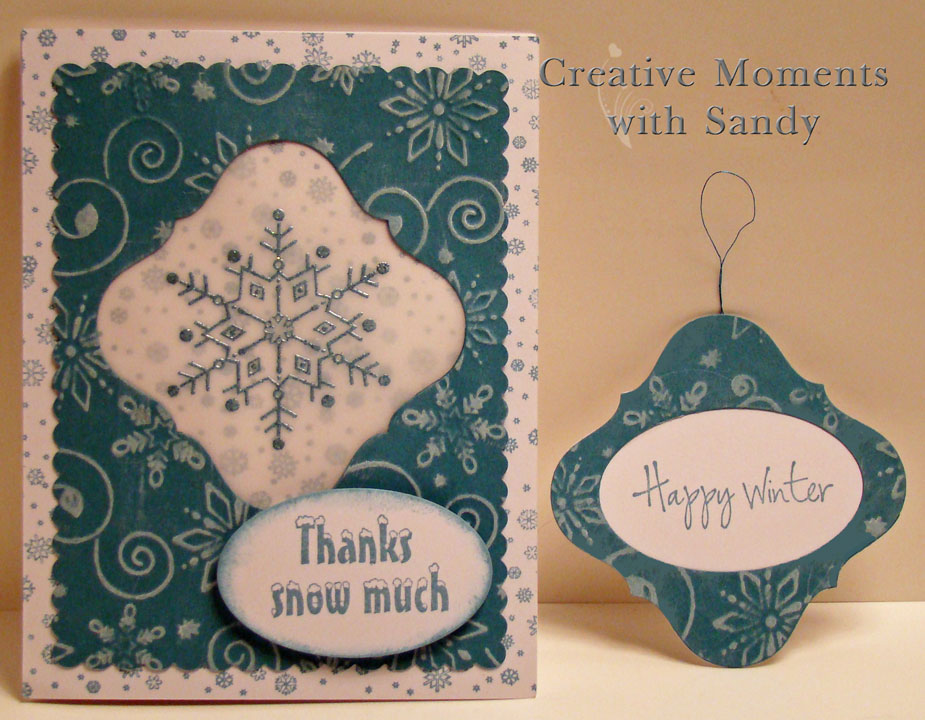
Here is one of the wonderful make and takes we did using dies from Cheery Lynn Designs and stamps and ink from Sweet Stamps at the Open House Friday and Saturday.

We started with the blue panel which was die cut with Cheery Lynn Designs largest die from the Scalloped Rectangle Card-Maker's Nesting Dies. We embossed this panel with the fabulous new Snowflake Flurries XL embossing plate, running white dye ink over the raised areas. Isn't it beautiful? Using the largest die from the Little Stackers French Flair Nesting dies, turning it on point, we cut the opening in the embossed panel as well as a second French Flair from white card stock. Vellum was added to the back of the opening and the Sweet Stamps 8033 - Crystal Snowflake was stamped with Shades Aquamarine dye ink and heat embossed with Diamonds and Pearls embossing powder. It really shimmers! The background panel was created using Sweet Stamps 8022 - Tiny Snowflake Background stamped with Shades Tidal Wave dye ink. Using a die from the Little Stackers Oval Nesting dies, we cut an oval in the center of the ornament as well as an oval from white card stock. On the white card stock oval, we stamped 9103 - Snow Thanks with Tidal Wave dye ink, distressing the edges with the ink as well. This was added to the card with pop dots for some dimension. Next we added a hanger to the French Flair ornament, then adhered the white card stock French Flair to the back of it. The last step was to stamp 8028 - Happy Winter in the opening on the ornament. What a fabulous card with a wonderful little ornament enclosure.
Supplies used:
- Scalloped Rectangle Card-Maker's Nesting Dies
- Snowflake Flurries XL embossing plate
- Little Stackers French Flair Nesting dies
- Little Stackers Oval Nesting dies
- Shades Aquamarine dye ink
- Shades Tidal Wave dye ink
- White dye ink
- Diamonds and Pearls embossing powder
- 8033 - Crystal Snowflake
- 8022 - Tiny Snowflake Background
- 9103 - Snow Thanks
- 8028 - Happy Winter
Monday, November 29, 2010
Winter Holiday Open House

Our annual Winter Holiday Open House is taking place this weekend - Friday, Dec. 3rd from Noon-6pm & Saturday, Dec. 4th from 10am-5pm
Join us for FREE winter themed make & takes! We'll be showcasing some NEW products from Cheery Lynn Designs (dies & embossing plates), Crafts Too (embossing folders), Joy and Marianne (cutting & embossing dies).
Enjoy 10% off all purchases made at Open House.
Our trade show booth is set up in the heated warehouse (location of our old retail store: 7035 E. Grand River, Fowlerville - across from the Post Office), where we will be serving snacks and refreshments.
Hope to see you there,
:) Stacey
Thursday, November 25, 2010
Thanksgiving

I have many things I am thankful for, but one of the most recent blessings in my life has been the opportunity to travel across the country to share the joys of rubber stamping with others who are as addicted as I am to this wonderful hobby.
I hope you have a fantastic Thanksgiving holiday with loved ones as you count all the many blessings in your life.
— Stacey
Sunday, November 14, 2010
More Embossing Plate Fun
Ready for more embossing plate fun? The samples shown here are from Cheery Lynn Designs and are available for purchase at shop.sweetstamps.com
The next several examples require a tabletop die cutting/embossing machine and a thin rubber mat.
Enjoy!

#3 Embossed Cardstock
creates raised "hills" and recessed "valleys" in the paper

#4 Sanded Embossed Cardstock
requires Core'dinations color core cardstock and sanding block

#5 Faux Sanded Embossed Cardstock
medium to dark colored cardstock and White Dye Ink Pad

#6 Inked Embossed Cardstock
use ink pad direct to paper to color the "hills"

#7 Inked Embossing Plate
ink plate to color the "valleys"

#8 Sponged Embossed Cardstock
colors the "hills" and "valleys"

#9 Easy Color Embossed Cardstock
requires Easy Color transfer film

#10 Colored Hills & Valleys Embossed Cardstock
creates a 2 tone effect
The next several examples require a tabletop die cutting/embossing machine and a thin rubber mat.
Enjoy!

#3 Embossed Cardstock
creates raised "hills" and recessed "valleys" in the paper

#4 Sanded Embossed Cardstock
requires Core'dinations color core cardstock and sanding block

#5 Faux Sanded Embossed Cardstock
medium to dark colored cardstock and White Dye Ink Pad
#6 Inked Embossed Cardstock
use ink pad direct to paper to color the "hills"

#7 Inked Embossing Plate
ink plate to color the "valleys"

#8 Sponged Embossed Cardstock
colors the "hills" and "valleys"

requires Easy Color transfer film

#10 Colored Hills & Valleys Embossed Cardstock
creates a 2 tone effect
Tuesday, November 2, 2010
Embossing Plate Fun (without a machine)
There are so many looks you can get with one embossing plate, here are just a couple to get you started:
 No machine required for these two techniques!
Rub Shades™ dye ink directly onto plate, place cardstock onto inked plate and use a brayer to evenly transfer ink from the plate to the cardstock.
For the sample to the right, I used Shades™ dye ink in Tank green on the E127 Foliage Embossing Plate by Dies Direct and used a wide rubber brayer to transfer the ink to white CS.
MagicStamp™ Foam Block required. Make a reverse image stamp of the pattern on the plate by heating up a block of magic stamp foam and pressing it into the plate while warm. Ink the foam like you would a stamp, and when you stamp it on cardstock you’ll get a reverse impression of the pattern on the plate.
 The sample pictured here was created by pressing a MagicStamp™ Foam Block onto the E127 Foliage Embossing Plate, inking with Shades™ dye ink in Paprika and stamping onto white CS.
Check back soon for even more embossing plate fun!
 No machine required for these two techniques!
#1. Litho Plate Transfer
Rub Shades™ dye ink directly onto plate, place cardstock onto inked plate and use a brayer to evenly transfer ink from the plate to the cardstock.
For the sample to the right, I used Shades™ dye ink in Tank green on the E127 Foliage Embossing Plate by Dies Direct and used a wide rubber brayer to transfer the ink to white CS.
#2. Reverse Image Stamp
MagicStamp™ Foam Block required. Make a reverse image stamp of the pattern on the plate by heating up a block of magic stamp foam and pressing it into the plate while warm. Ink the foam like you would a stamp, and when you stamp it on cardstock you’ll get a reverse impression of the pattern on the plate.
Check back soon for even more embossing plate fun!
Friday, October 22, 2010
Fancy Flare Shaped Card

Here is a card using the new embossing plates from Dies Direct, this one is called Foliage. I inked the plate with Shades Dye ink Forest, then embossed Stardreams text weight paper. The card base and the green panel behind the image are die cut using my French Flair dies from Dies Direct, the card is a full 5.5" square. I stamped the Entwined Roses image with Memento Tuxedo black ink on Cryogen paper. Copics used:
Roses - R81, R83, R85
Leaves - G21, Y15
Background - G20
The Stardreams paper was an off white which is why I added the background around the roses with G20. But then the background was too green, so I simply airbrushed YG01 onto the Stardreams foliage embossed panel and everything matched. I also airbrushed both the roses (Prima) and the gems to match with R85. The shimmer from the Stardreams paper as well as the Cryogen I stamped on really makes this card beautiful.
Thursday, October 21, 2010
Sweet Stamps Poinsettia
SweetStamps is now carrying cutting dies and embossing plates from Dies Direct. These dies are heavy metal dies and unlike other companies which are made in China, these are made in the USA. For this card, I have used my new E129 Poinsettia embossing plate, it will emboss an area that is 5-7/8 x 7-3/4 inches. So you could make a background for a 6" square card with no seams. Incredible!

I began by rubbing Shades™ Duchess Rose ink all over the die. Because it is metal, you don't have to worry about the ink getting in the recessed areas as the die does not bend like plastic ones. Then using a piece of Stardreams Opal text weight paper, I embossed it using my Cuttlebug. There are two great things about using text weight paper for embossing; one, you get a really detailed embossing, two, it keeps the weight of the card down. And the really fun thing about Stardreams is the shimmer to the paper, it is iridescent. Next, I stamped Sweet Stamps Poinsettia large and Merry Christmas large with Memento Tuxedo black ink onto Stardreams Opal card stock. Copics used:
Petals - R81, R83, R85
Leaves - G21, G28
Berries - YR15
I cut out the poinsettia and popped it up above the sentiment. Finished size is 5.5" square.
Wednesday, October 20, 2010
Finally, a blog!
Welcome to the official SweetStamps blog (FINALLY)! I've only been wanting to get this started for a year or two now, but as you may know I've been on a bus with the family traveling from trade show to trade show in a different city each week.
The purpose of this blog will be to share exciting news, samples, specials, products and techniques from SweetStamps.com and many talented ladies who love to stamp and paper craft. I have always believed in educating our customers which is why we're traveling the rubber stamp show circuit to bring our company to a city near you. In 2011, I hope to be able to teach classes at each convention or a nearby store. I'll be counting on you, our valued customers, for some insight to make sure we are giving you what you want in terms of product mix, education and value. Please feel free to email any suggestions or comments to me at info@sweetstamps.com.
When you see a link in a post (like this: www.shop.sweetstamps.com) clicking on it will open a new window and take you to our store site to make ordering easier. You can also link to our store by clicking on the SweetStamps.com logo in the upper left side of this blog.
Last but certainly not least, I'd like to thank Sandy Fredrick and Sandy Hulsart for all their help: at shows, behind the scenes, making samples, packaging, labeling, etc. I'd be lost without my Sandys, they are truly PRICELESS :)
Happy stamping,
Stacey Richardson
SweetStamps.com
Friday, January 1, 2010

Subscribe to:
Posts (Atom)